Adding LED ON/OFF to Servo Sweep (Ramya)
Learning Objective:
How a Servo Motor works.
Assignment:
Make the servo move when green and stop when red. Using Arduino Micro Servo 9g SG90.
Meeting the Servo Motor
* The Servo Motor is a closed loop system that uses position feedback to control its motion and final position.
* Used for controlling RC toys cars, boats, airplanes ...etc. Also, used by engineers for prototyping in robotics, creating robotic arms, human robots and so on.
* The Servo Motor has 3 wires attached (brown, red, and yellow).
The brown wire is the ground wire.
The brown wire is the ground wire.
The red wire is the 5V wire.
The yellow wire is the signal wire.
Brown + Red = supply power to the Servo Motor.
Yellow = controls speed.
Brown + Red = veins.
Yellow = nerves.
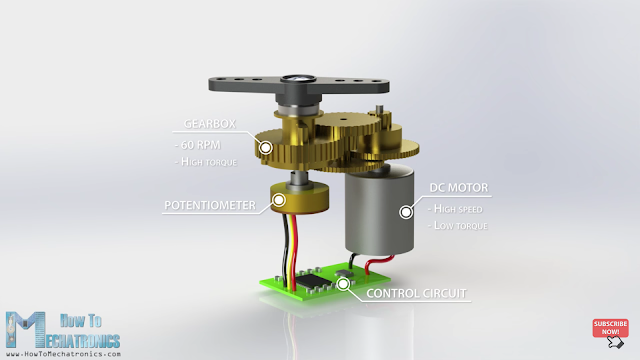
* It contains 4 main components:
DC Motor: high speed and low TORQUE.
Gear Box: reduces the speed to around 60 RPM, increase the TORQUE.
Potentiometer: as the motor rotates the potentiometer produces a variable voltage, relative to the angle.
Control Circuit: the potentiometer is compared to the voltage coming from the signal line. If needed the controller activates an integrated H-BRIDGE, which enables the motor to rotate in either direction, until the 2 signals reach a difference of 0.
Wiring Setup
 |
Code
Outcome
|
I enjoyed exercising what I learned in C++ this past semester. It's great to put it to use right away.
I initially had set the servo position loop from 0 to 360 degrees, where Red is 0 and Green is 360.
I learned that the Servo Motor is only capable of rotating 180 degrees, which means that if we start from a downward position it will only rotate up to the top, making half a circle, back and forth, so, I re-set the servo position to loop follows:
Red (OFF) 0 to 90 degrees
Green (ON) 90 to 0 degrees
I found that the best it worked was:
Red (OFF) 0-90 degrees
Green (ON) 90-180 degrees
Learning Resources


Comments
Post a Comment